How to Unsubscribe from Emails in Outlook (2026)
Learn how to unsubscribe from emails in Outlook across desktop, web, and mobile. Includes when NOT to click unsubscribe for security reasons.

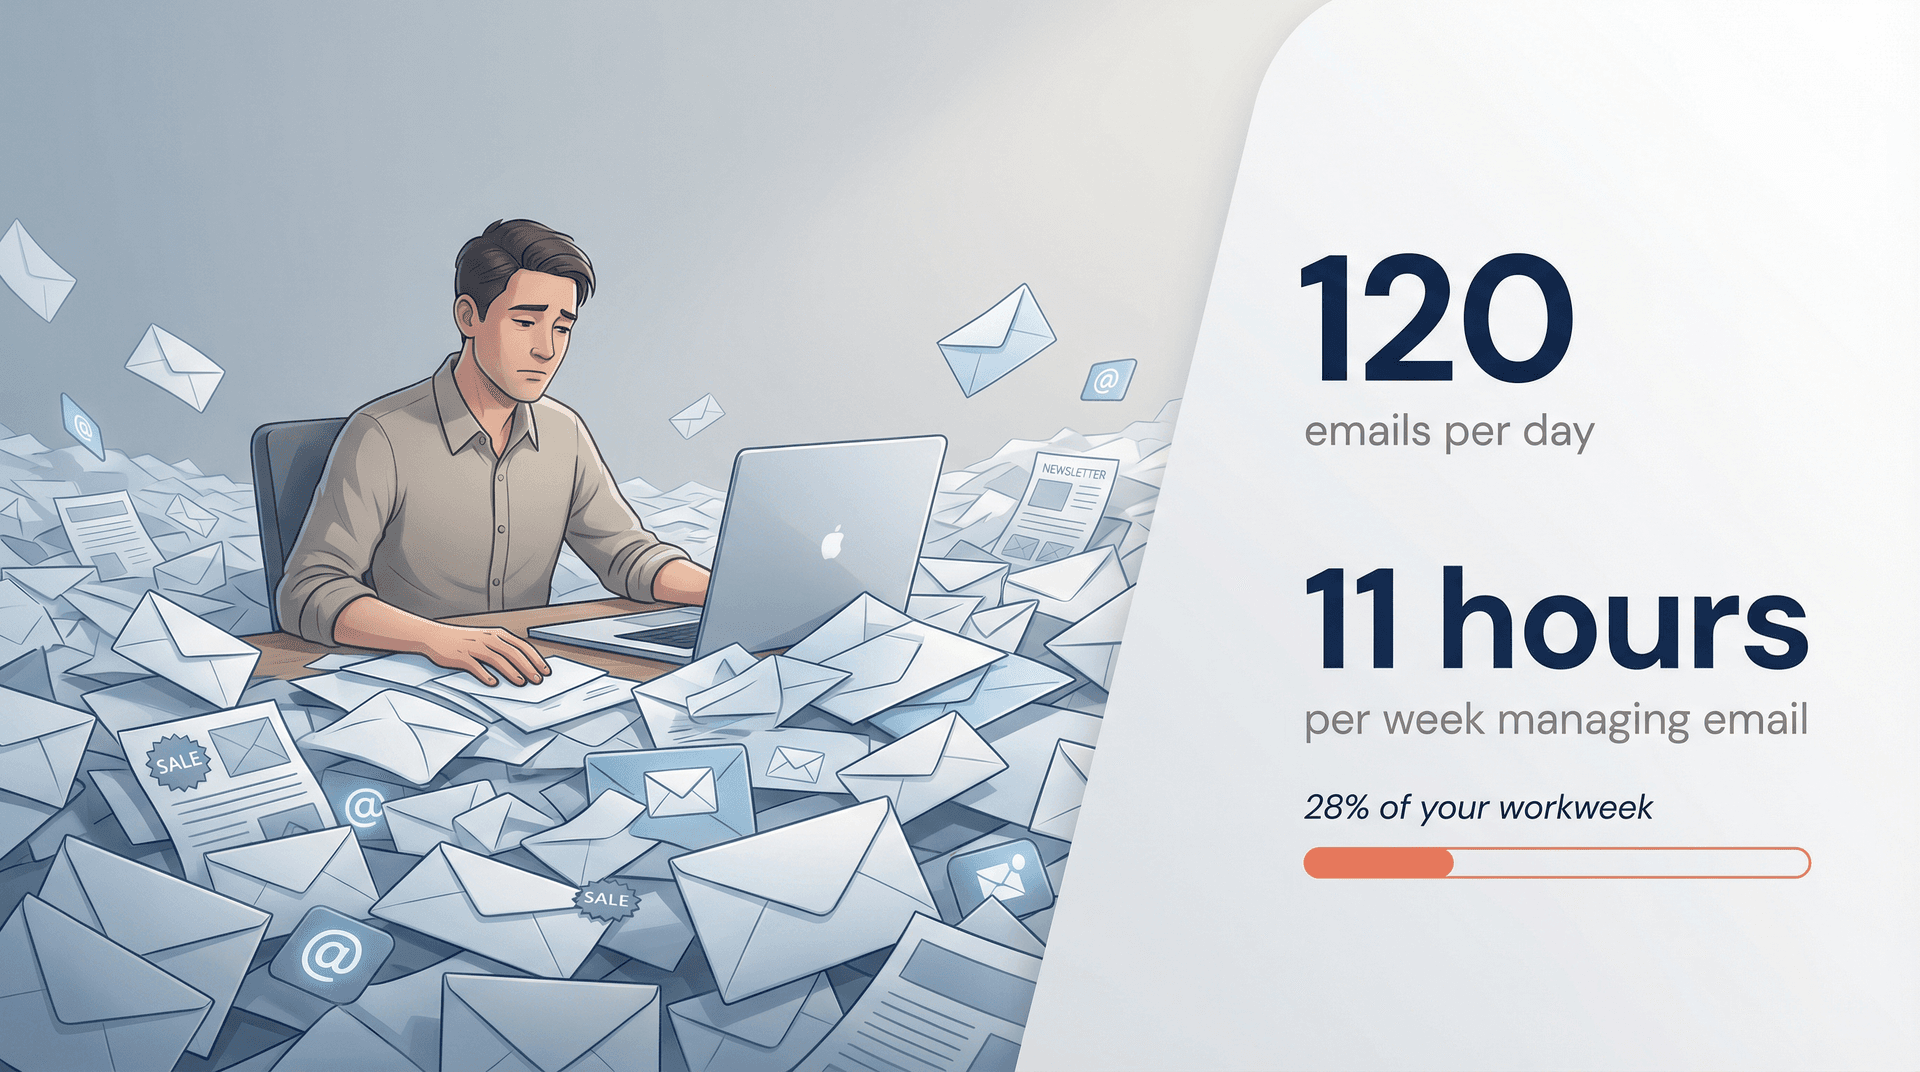
Your inbox is probably overwhelming right now. Maybe you've got hundreds of unread newsletters you never open, promotional emails from stores you shopped at once three years ago, and those "weekly digest" emails that arrive like clockwork but go straight to your mental trash. You're not alone — the average office worker receives over 120 emails per day and spends roughly 28% of their workweek, or about 11 hours, just managing email (according to productivity research).
Unsubscribing from emails you don't want is one of the most effective ways to declutter your Outlook inbox and reclaim that time. But unlike Gmail (which shows a clear "Unsubscribe" button on most promotional emails), Microsoft Outlook can be less obvious about where to find the unsubscribe option. Sometimes the button appears, sometimes it doesn't, and sometimes clicking "unsubscribe" can actually make things worse if you're not careful.
This guide will show you exactly how to unsubscribe from emails in Outlook across every version (desktop, web, and mobile), when you should never click unsubscribe for security reasons, and how tools like Inbox Zero can help you bulk unsubscribe from hundreds of emails in minutes instead of hours. By the end, you'll have a cleaner inbox and a system to keep it that way.
Why Doesn't Outlook Show an Unsubscribe Button?
You've probably noticed that some emails have a convenient "Unsubscribe" button right at the top, while others force you to scroll through fine print at the bottom. Or worse, some emails have no visible unsubscribe option at all.
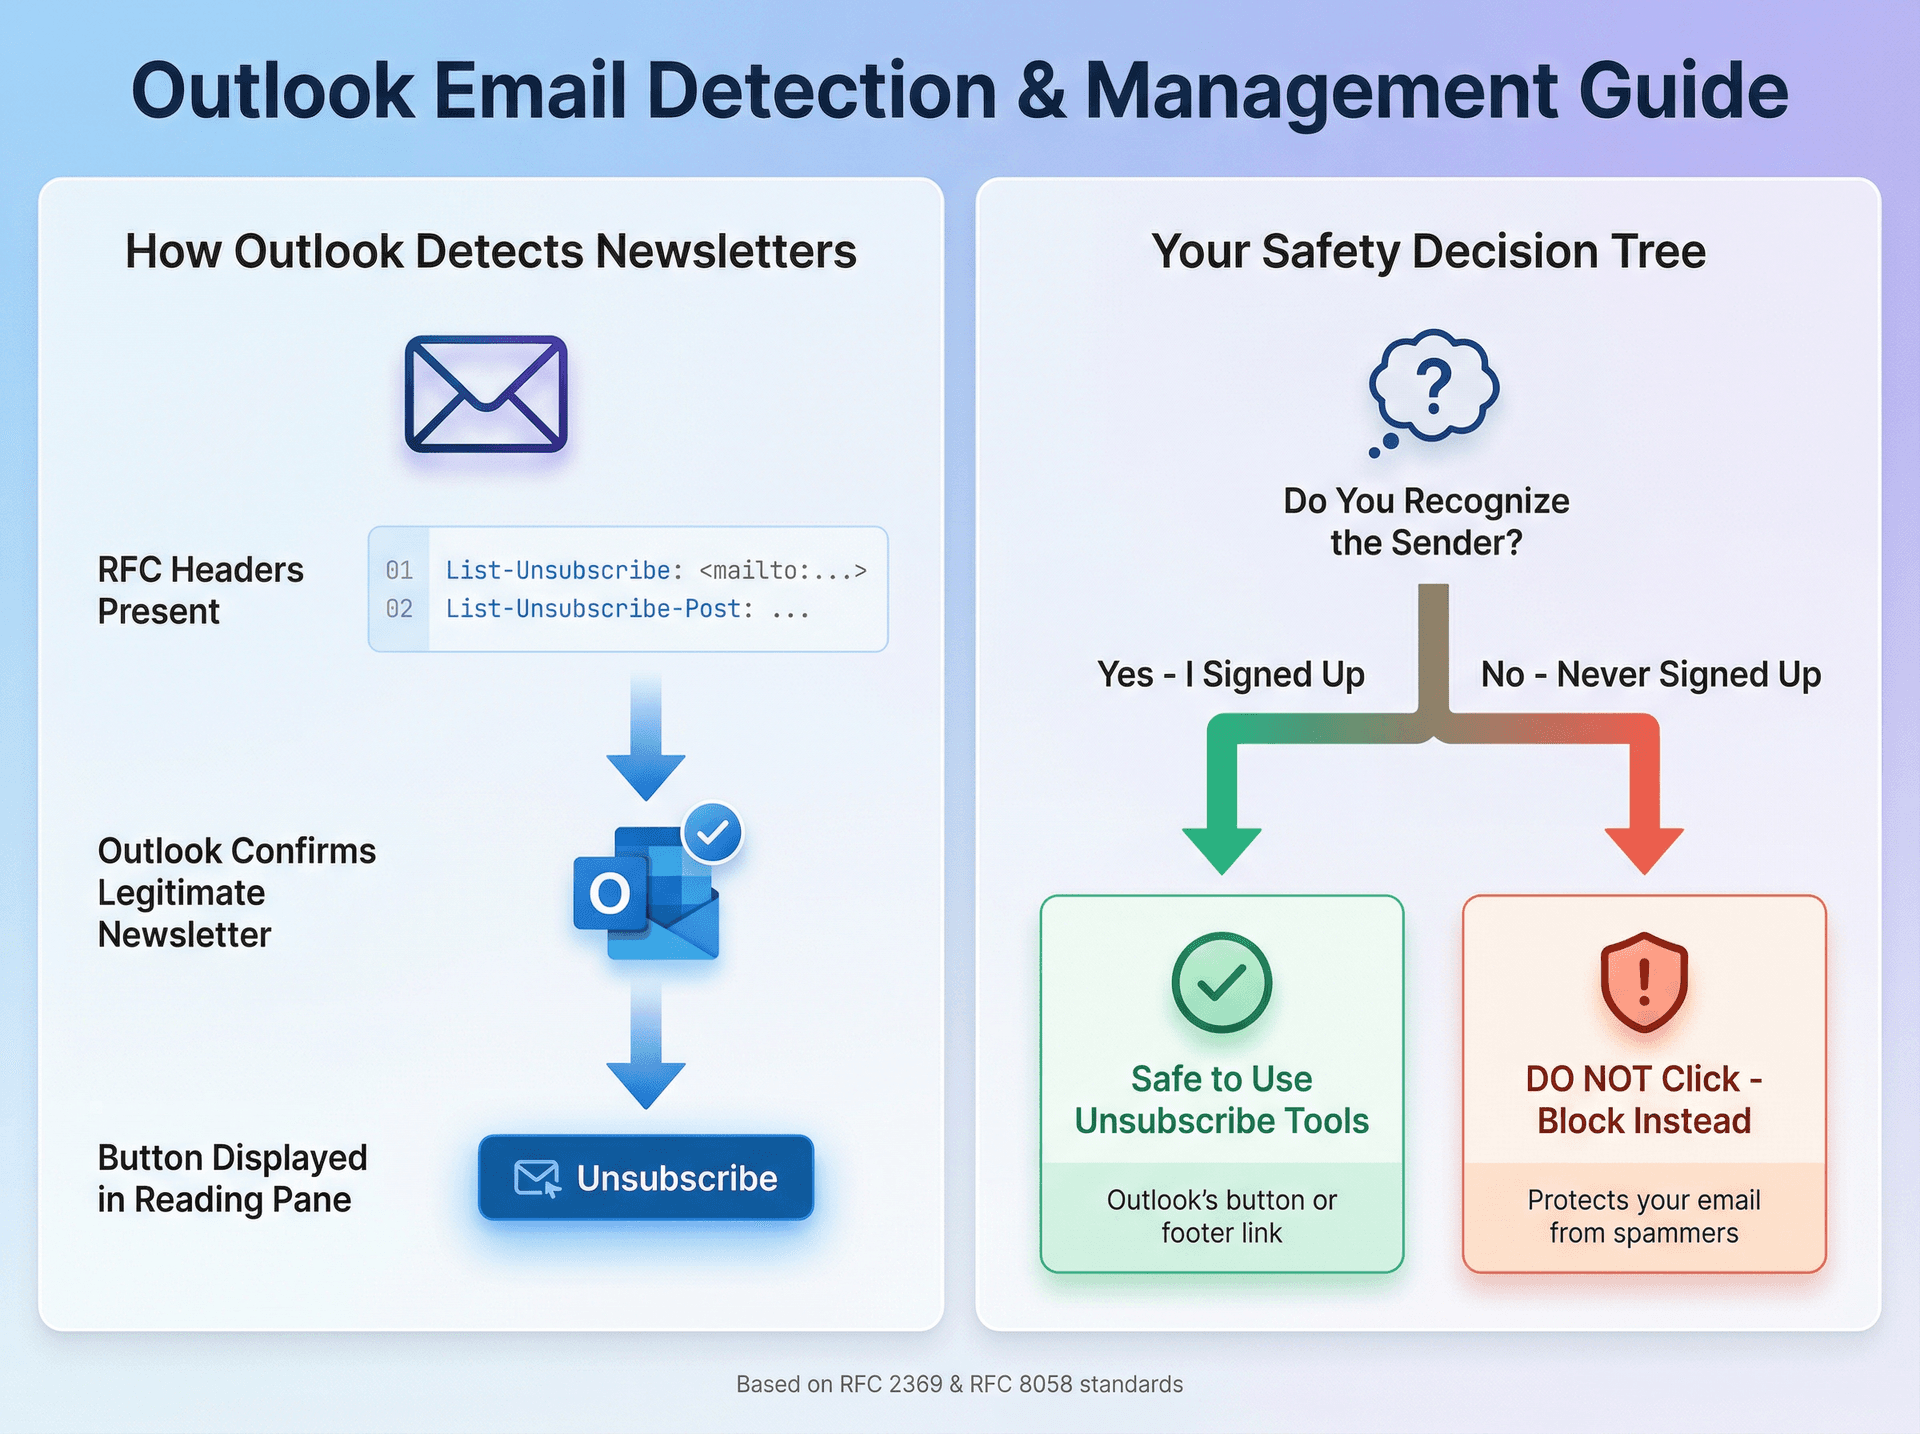
Here's why: Outlook can only offer a clean unsubscribe button when it can confidently detect that a message is from a legitimate mailing list. Under the hood, most email clients (including Outlook) rely on standardized email headers like List-Unsubscribe (defined in RFC 2369) and one-click unsubscribe signaling (RFC 8058). When a sender includes these headers properly, Outlook recognizes the message as a newsletter and displays the unsubscribe option prominently.
But many senders don't implement these standards. Small businesses, marketing teams using DIY email platforms, and (obviously) spammers often skip these headers entirely. When that happens, Outlook.com examines incoming emails and looks for subscription identifiers in the message header to decide whether it's a subscription email.
In practice, this means that if the sender didn't implement proper headers, Outlook won't show a built-in unsubscribe button. If the message landed in your Junk folder, Outlook may not surface subscription management tools at all. And if Outlook can't confidently identify the email as legitimate, you're on your own to find the unsubscribe link buried in the footer.
Quick diagnostic:
If you recognize the sender and willingly signed up for their emails, use Outlook's unsubscribe tools (we'll cover how below). If you don't recognize the sender or suspect it's spam, do not click anything in the email. We'll cover what to do instead in the security section.
How to Unsubscribe in Outlook Desktop (Windows & Mac)
If you use the Outlook desktop application (part of Microsoft Office or Microsoft 365 on Windows or Mac), you can often unsubscribe from newsletters directly from the email. This is the safest and fastest method when it works.
Here's how:
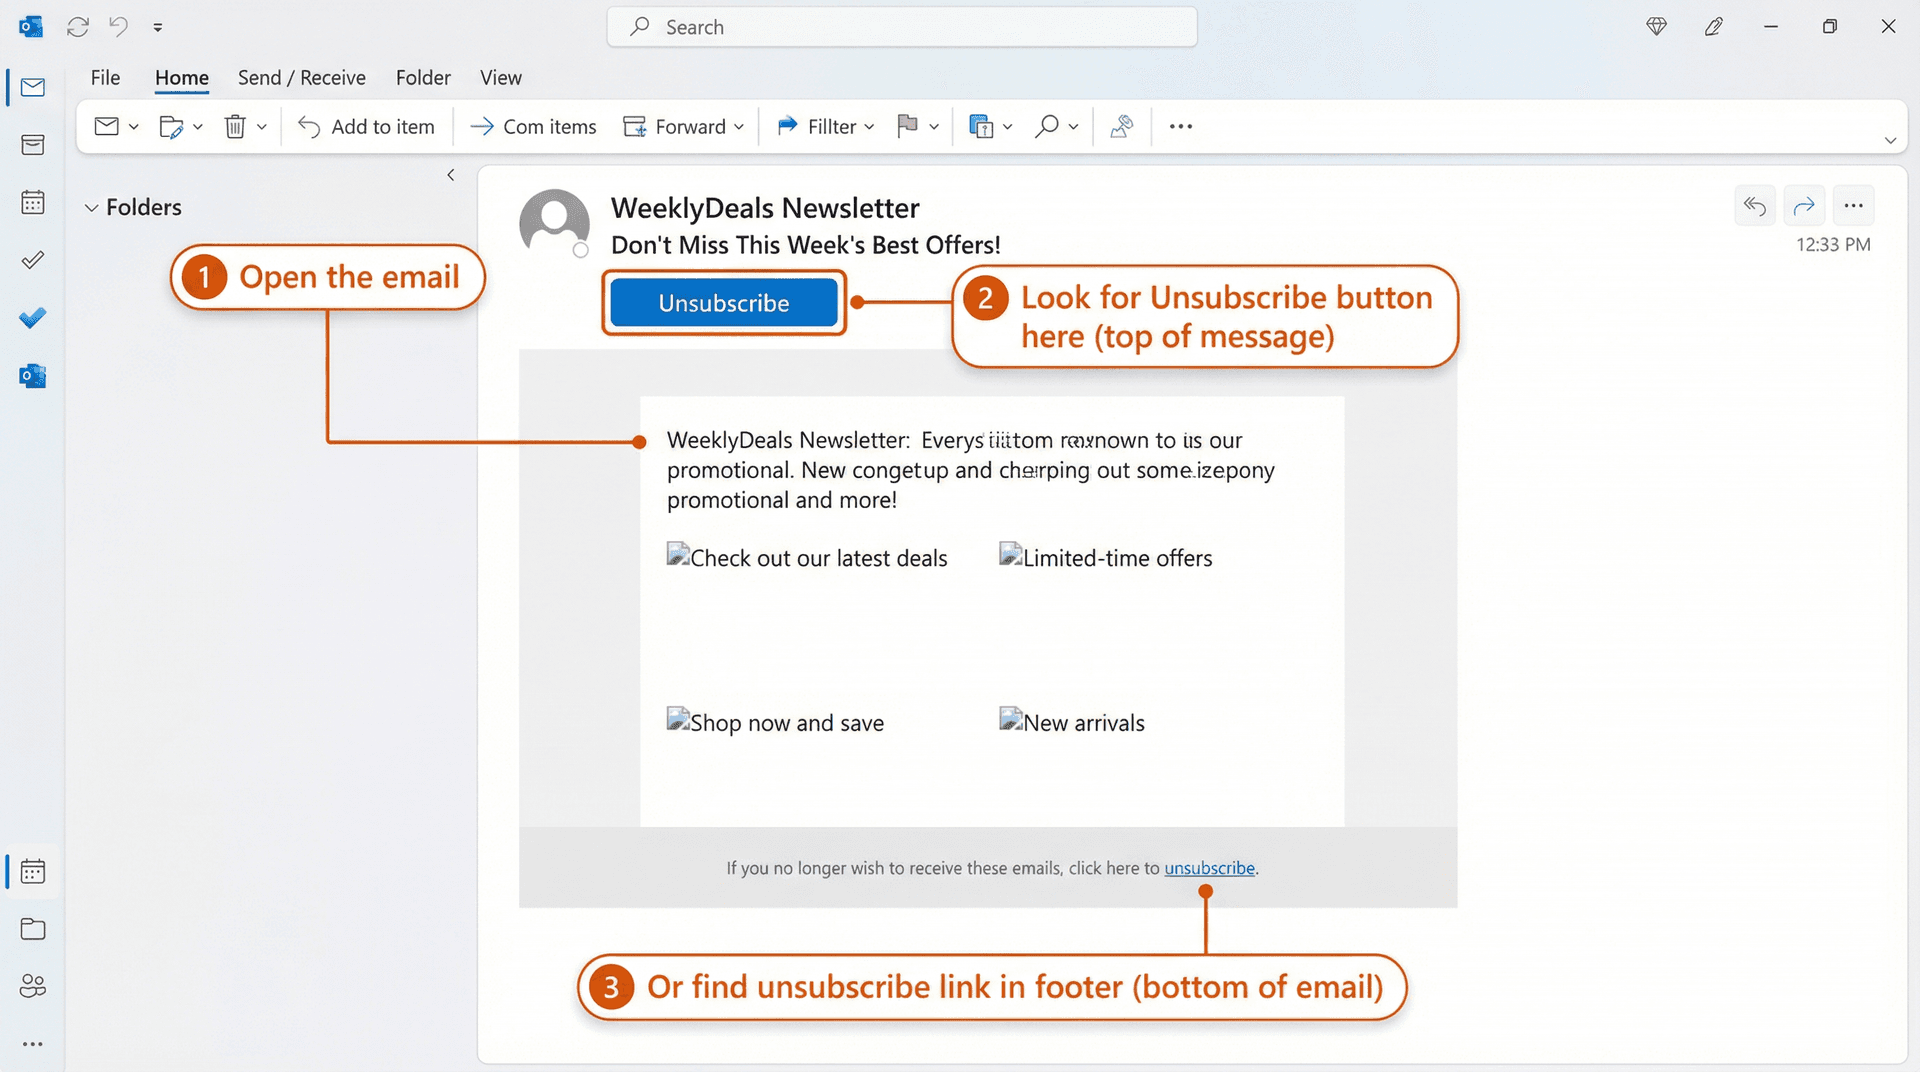
Start by opening the email from the sender you no longer want to hear from, then look for an "Unsubscribe" option at the top of the message, near the sender's name or address. In newer versions of Outlook, if the sender included proper unsubscribe headers, you'll see an Unsubscribe button in the reading pane header (right next to the sender's name). It might say "Unsubscribe" or show a link icon.
Click the Unsubscribe button and confirm when prompted. Outlook will stop delivering future emails from that sender, and for reputable senders, Outlook.com also attempts to inform them to remove you from their mailing list — so you're unsubscribed at the source too.
If no Unsubscribe button appears at the top, don't worry. Not every email newsletter includes the special header that Outlook relies on. In that case, scroll down to the footer of the email and look for an "Unsubscribe" link there. Most legitimate mass emails include a small unsubscribe link at the very bottom (often in tiny gray text). Click that link — it usually opens a web page or creates a draft email to confirm your removal. Complete any confirmation steps required, and you should see a success message confirming you're unsubscribed.
What if there's no unsubscribe link at all?
If you see no unsubscribe link anywhere (top or bottom), that's a red flag. Legitimate companies are legally required to provide an unsubscribe mechanism in commercial emails. If it's missing entirely, the email is likely spam or from a sender ignoring regulations. Don't waste time looking for it — skip to Method 4: Block Senders below.
How to Unsubscribe from Outlook Emails on the Web
If you use Outlook Web App (OWA), Outlook.com webmail, or your work/school email through a browser, the process is slightly different but just as straightforward. In fact, Outlook on the web has some extra features that the desktop app doesn't.

Use the top-of-email Unsubscribe button:
Open Outlook in your web browser and sign in to your account. Navigate to your Inbox and click on a newsletter or promotional email you want to unsubscribe from. If Outlook detects it's a mailing list or newsletter, it will often display an "Unsubscribe" button prominently at the top of the reading pane. Click it and confirm when prompted.
Behind the scenes, Outlook will put the sender on your block list to ensure no more emails come through. For known legitimate senders, it may also notify them to remove you from their list.
Manage all email subscriptions in one place (Outlook.com only)
This is where Outlook on the web really shines. Outlook.com provides a central place to manage all your email subscriptions in one dashboard.
| Step | Action | What Happens |
|---|---|---|
| 1 | Click the gear icon (Settings) in the top right | Opens quick settings pane |
| 2 | Choose "View all Outlook settings" at the bottom | Opens full settings modal |
| 3 | Navigate to Mail → Subscriptions | See all your subscription senders |
| 4 | Click Unsubscribe next to each sender | Stops those emails |
| 5 | Confirm your choice | Sender is blocked/unsubscribed |
Here you'll see a list of all newsletters or senders that Outlook has identified as subscription emails. It's like a control panel for your newsletter subscriptions.
Important limitations to know:
This Subscriptions list is incredibly handy for finding all your newsletter senders in one place without hunting through your inbox. But there's a catch: it only includes senders that Microsoft automatically detected as "subscription" mail (usually those with unsubscribe headers or mass-mail characteristics). If a particular sender isn't listed here, you'll need to unsubscribe by opening one of their emails and using the Unsubscribe button or the link in the footer.
After clicking Unsubscribe next to a sender in this list, Outlook will ask for confirmation. Confirm, and you can verify by refreshing the list — the sender you unsubscribed should disappear from the Subscriptions page, and you won't see new emails from them in your inbox.
How to Unsubscribe from Emails on Outlook Mobile
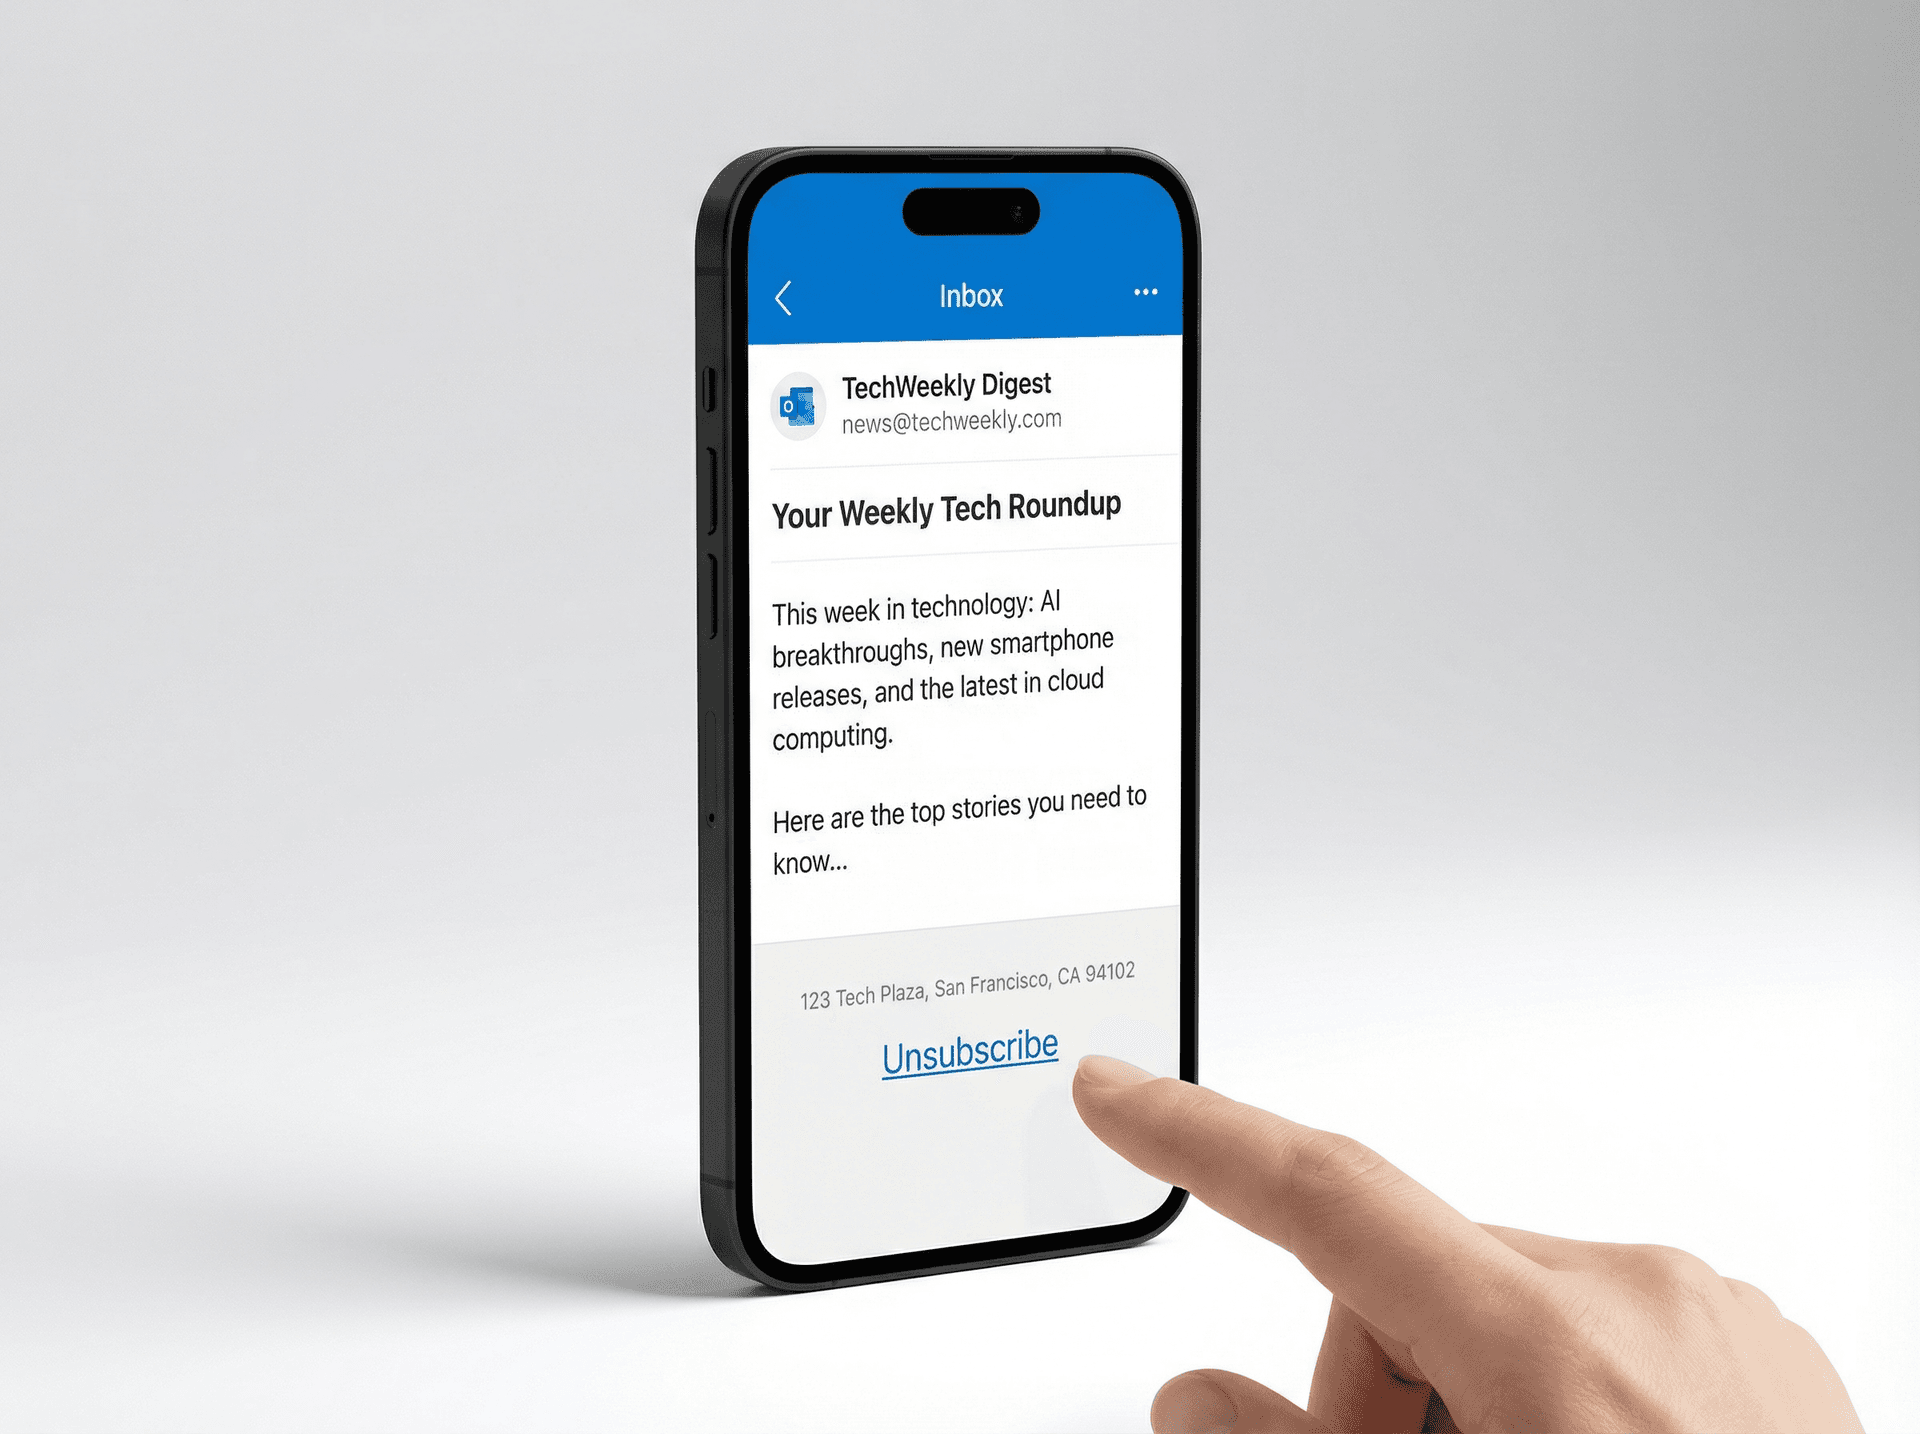
On Outlook's mobile app (iOS and Android), unsubscribing is possible too, though there's no dedicated "unsubscribe" button prominently displayed like on web or desktop. You'll need to find the unsubscribe link manually.
Open the Outlook app on your iPhone, iPad, or Android device and navigate to your inbox. Tap to open the email you want to unsubscribe from, then scroll down to the bottom of the message. Look for small text that says "Unsubscribe" or "Manage preferences" — it's typically in the fine print of the email footer. Sometimes it may appear near the top under the sender's name, but on mobile you usually need to scroll down.
Tap the unsubscribe link. This will usually open a browser window or prompt within the app, taking you to the sender's website or displaying a message asking you to confirm. Follow any on-screen instructions to finalize the unsubscribe. Once completed, close the window — you should stop receiving emails from that sender going forward.
Pro tip:
On some mobile emails, Outlook might provide an "Unsubscribe" action in a menu. Try tapping the three-dot menu (⋯) when reading an email — if you see an Unsubscribe option for recognized newsletters, you can use it for a one-tap solution. If not, the manual link method above is the way to go.
Unsubscribe Options by Outlook Version (Quick Reference)
Not sure which method applies to you? Here's a quick comparison:
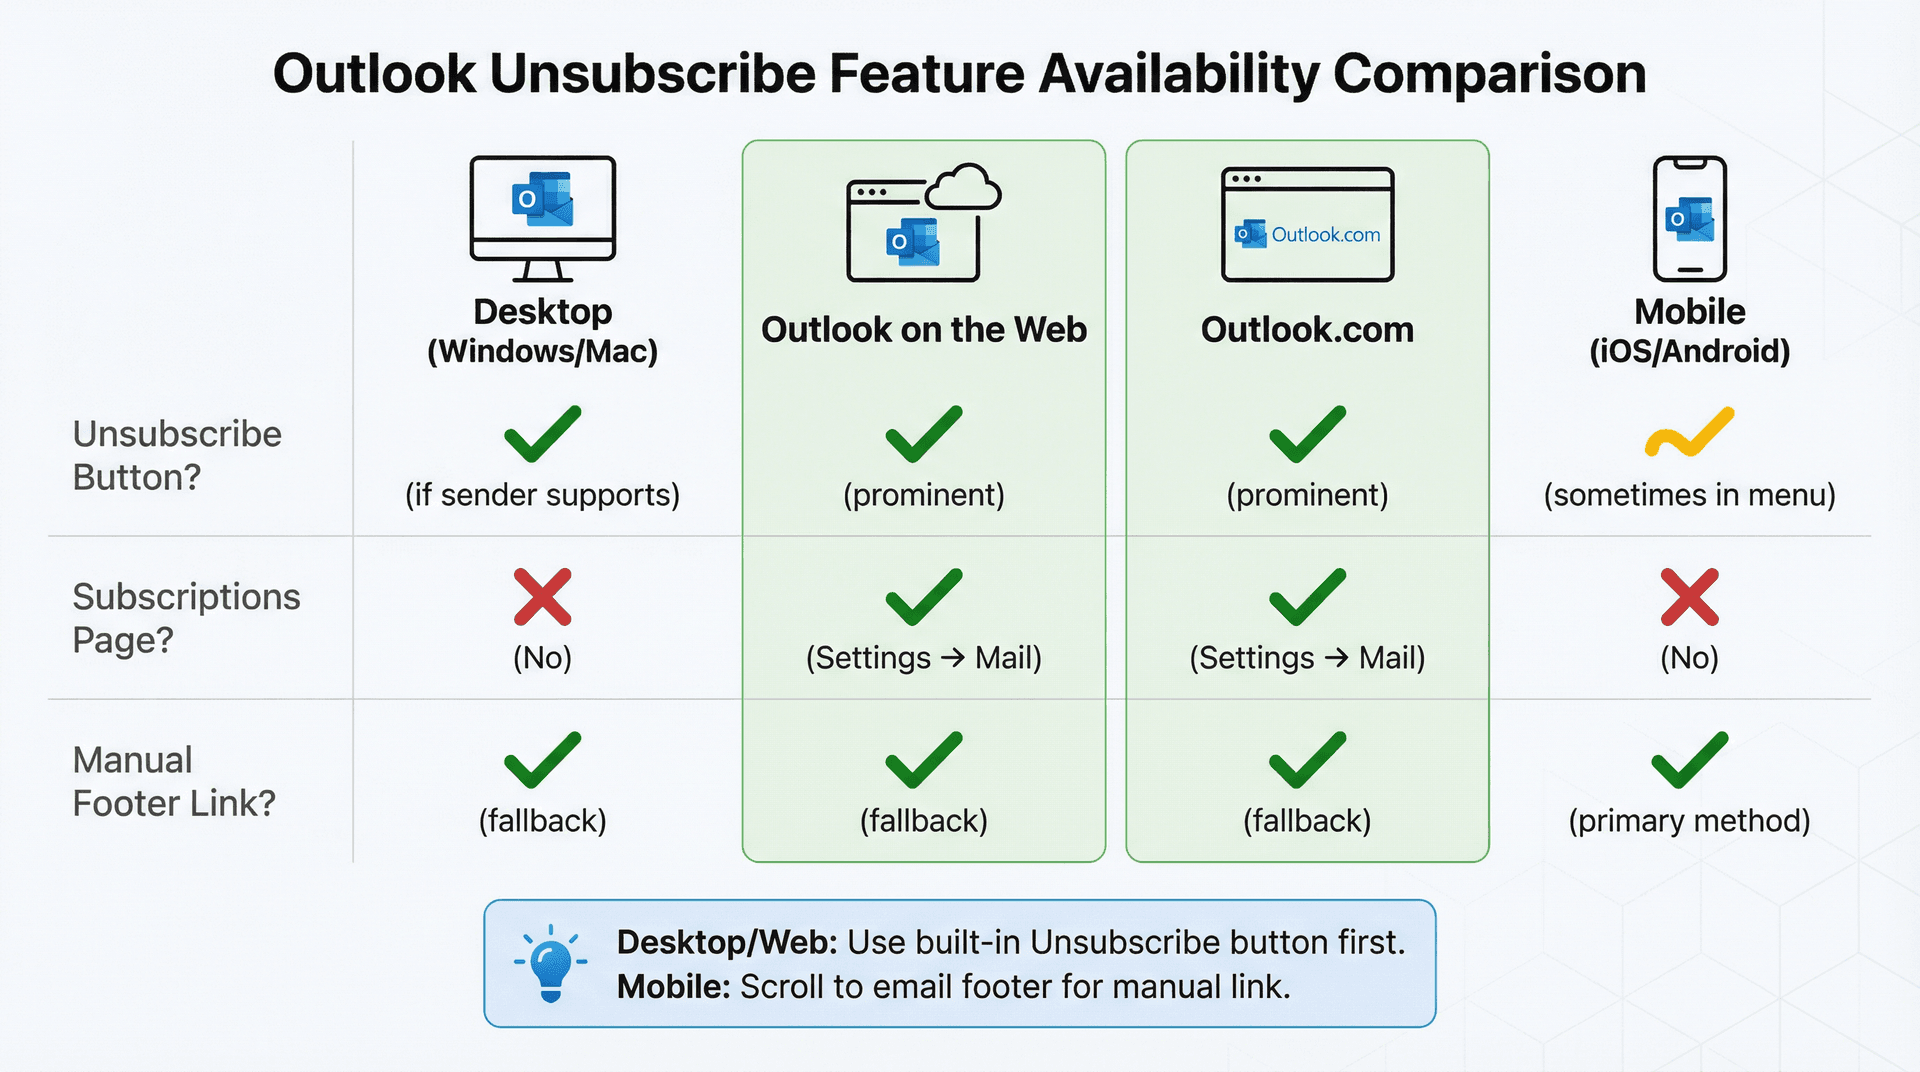
| Outlook Version | Unsubscribe Button? | Subscriptions Page? | Manual Footer Link? |
|---|---|---|---|
| Desktop (Windows/Mac) | ✓ Yes (if sender supports) | ✗ No | ✓ Yes (fallback) |
| Outlook on the Web | ✓ Yes (prominent) | ✓ Yes (Settings → Mail) | ✓ Yes (fallback) |
| Outlook.com | ✓ Yes (prominent) | ✓ Yes (Settings → Mail) | ✓ Yes (fallback) |
| Mobile (iOS/Android) | Sometimes (menu) | ✗ No | ✓ Yes (primary method) |
The key takeaway: if you're on desktop or web, look for the built-in Unsubscribe button first. If you're on mobile or the button doesn't appear, scroll to the email footer and find the manual link.
When NOT to Click Unsubscribe (Security Warning)
Here's something most people don't realize: clicking "unsubscribe" on the wrong email can actually make your spam problem worse.
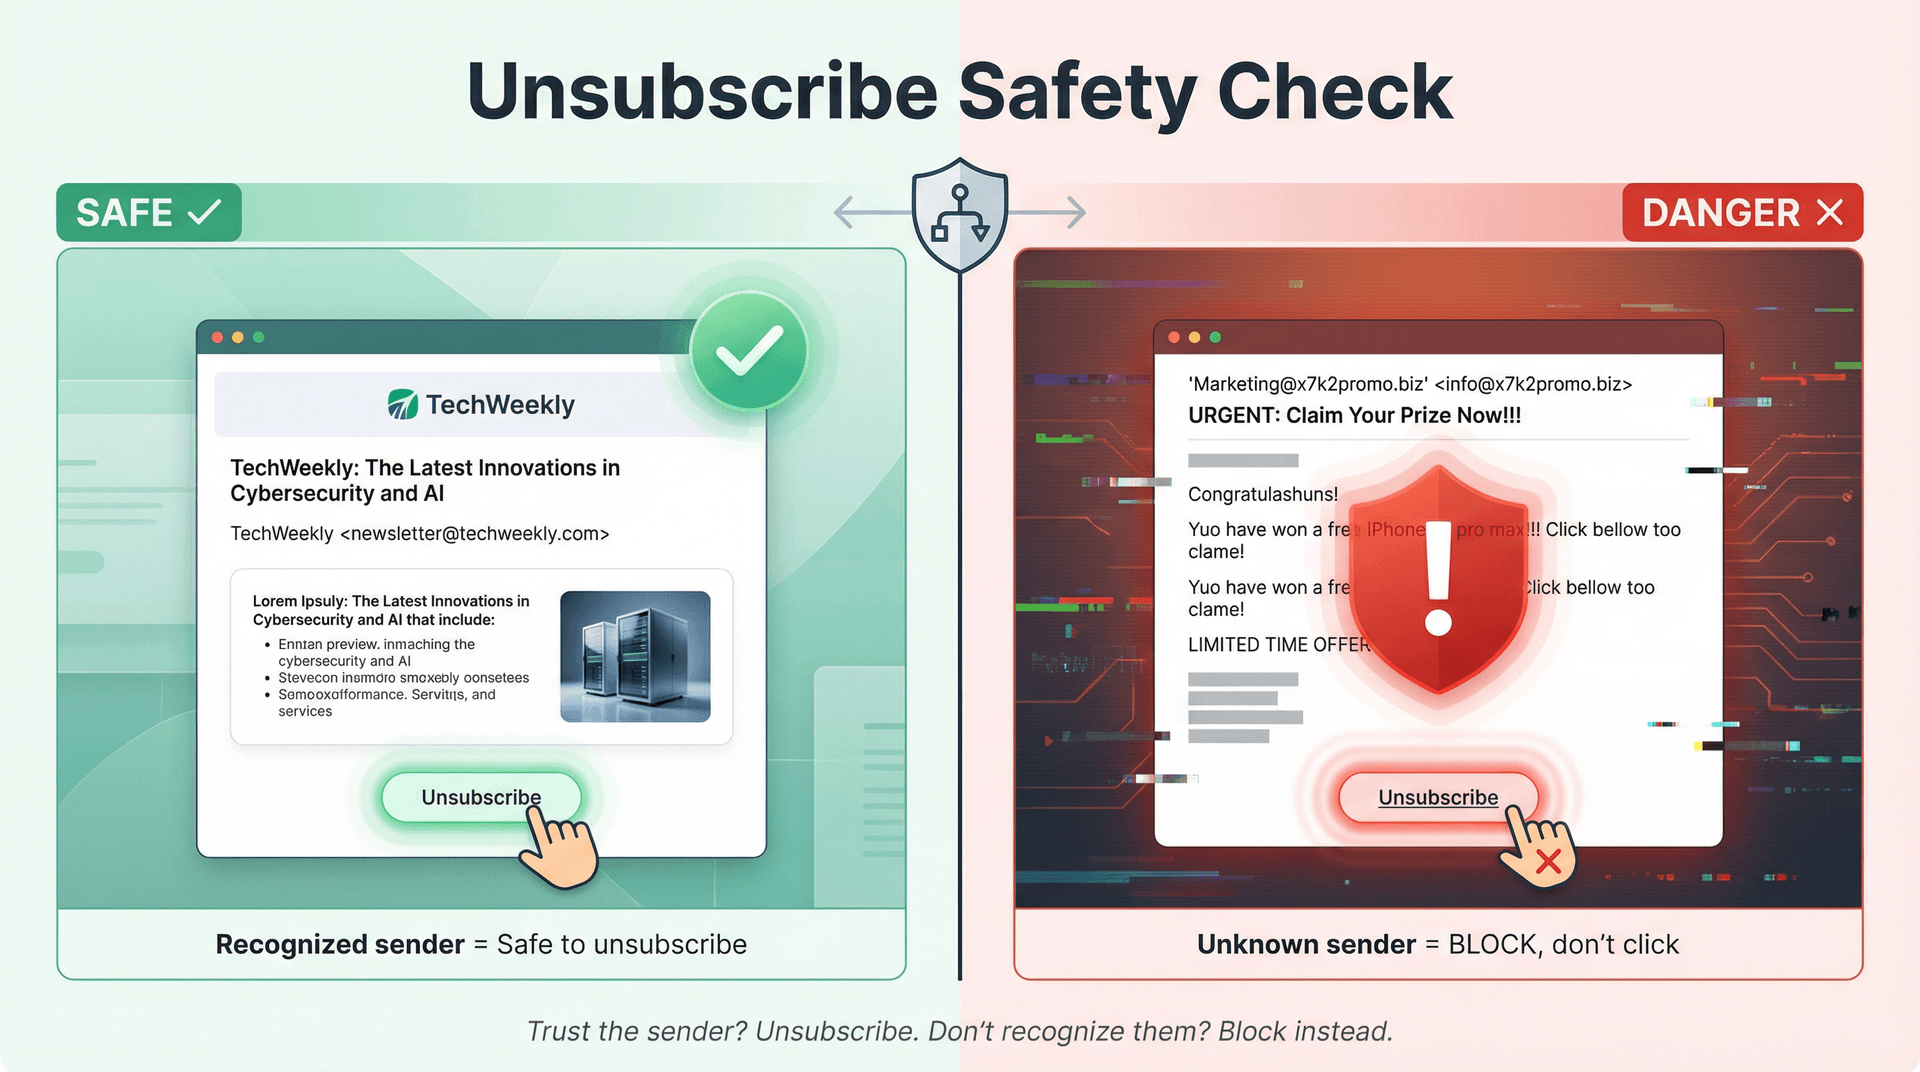
The risk with spam and phishing emails:
Security experts warn that you should never click "unsubscribe" on emails that you suspect are spam, scams, or phishing attempts — especially if you never explicitly signed up for them. When you click "unsubscribe" on a malicious or unsolicited email, you're essentially confirming to the spammer that your email address is active and being monitored. According to Microsoft MVP Diane Poremsky (May 2024):
"You do not want to unsubscribe from mail you did not subscribe to. That will only verify your address is valid and get you on more spammers' lists. If the sender is legitimate, then unsubscribing is ok."
The Cybersecurity and Infrastructure Security Agency (CISA) explicitly warns against clicking links in suspected phishing emails, including unsubscribe links, because they can confirm your email is active, lead to malicious websites, install malware or steal credentials, and get you added to even more spam lists.
The rule of thumb:
If you trust the sender and recognize you signed up for their emails, unsubscribe safely. If you don't recognize the sender or it looks suspicious, do not click anything — block instead.
This is where having a dedicated cold email blocker can help. Tools like Inbox Zero's Cold Email Blocker can automatically detect and handle suspicious outreach before you ever see it.
Examples of emails where you should NOT click unsubscribe:
Think random "get rich quick" schemes, emails from senders you've never heard of, obvious phishing attempts (fake bank alerts, lottery wins, and the like), generic spam with sketchy unsubscribe links, or emails where the "From" address looks suspicious with random letters and numbers. For all of these, skip to Method 4 below and block the sender instead.
How to Block Senders in Outlook Instead of Unsubscribing

Blocking a sender is different from unsubscribing. When you unsubscribe, you're asking the sender to stop emailing you. When you block, you're forcing Outlook to stop showing you their emails, whether they respect your request or not. Any future emails from a blocked address (or domain) go straight to your Junk E-mail folder or are rejected entirely, so they won't clutter your inbox.
When to block instead of unsubscribe:
Blocking is the better choice when you suspect the email is spam or phishing, when you've tried unsubscribing but they keep emailing you, when there's no unsubscribe link anywhere in the email, when the email looks suspicious or you never signed up, or when you simply want a nuclear option that guarantees you'll never see them again. For persistent cold emails and sales outreach that won't stop, consider using Inbox Zero's automated cold email blocking, which can detect and handle these automatically before they reach your inbox.
How to block on Outlook Desktop:
Right-click on the unwanted message in your inbox list. In the context menu, go to Junk (the icon looks like a prohibited sign) and click "Block Sender." Confirm if prompted. Outlook will add that sender to your blocked list, and you'll no longer see their emails in your inbox — they'll land in Junk or be deleted automatically.
How to block on Outlook Web (Outlook.com or Office 365):
You have a couple of options. The quick method: while viewing the email, click the "Junk" button in the toolbar and choose Block. The settings method: go to Settings → View all Outlook settings → Mail → Junk email. Under Blocked senders and domains, click Add, then enter the email address (or entire domain) you want to block, and save. Any mail from those addresses will be banished to Junk automatically.
As a bonus, you can also block from the Subscriptions page. Next to each subscription in the list, there's a three-dot menu. Click that and choose Block, then confirm. This both unsubscribes and blocks the sender in one action.
How to block on Outlook Mobile:
The mobile app doesn't have a direct "block sender" button, but you can mark messages as Junk. On iOS, for example, long-press or tap the three-dot menu (⋯) when reading an email and select Move to Junk. This trains Outlook that future messages from that sender are spam. To fully block a sender on mobile, you might need to use the web or desktop interface for complete control.
What happens after blocking:
Once blocked, future emails from these senders will either skip your inbox or be deleted entirely. On Outlook.com and web, junk email is retained for 30 days before automatic deletion. You can always review your Junk folder occasionally to ensure nothing important got caught there, and you can unblock senders via the settings if needed.
How to Auto-Filter Emails with Rules and Sweep
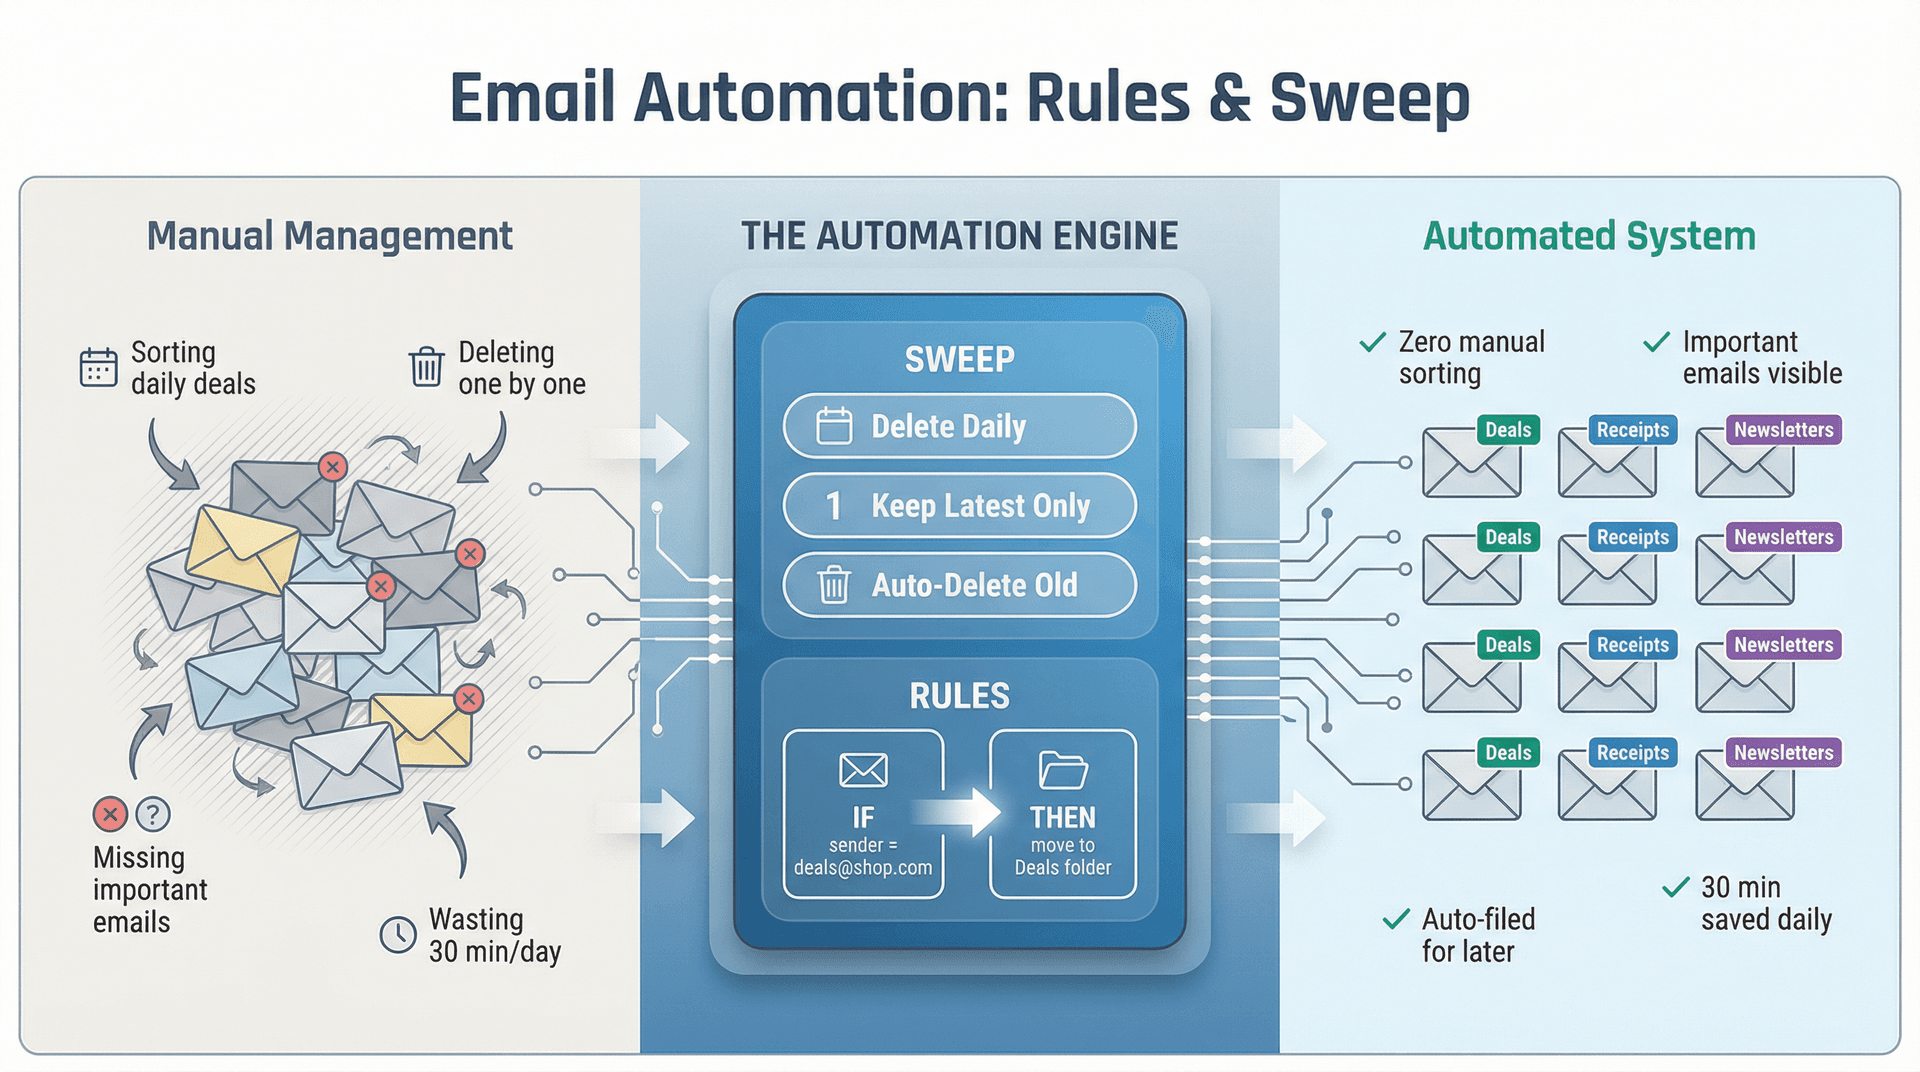
Sometimes you don't want to fully unsubscribe or block. Maybe you want to keep the emails (for receipts or records) but just get them out of your inbox automatically. That's where Outlook's Rules and Sweep features come in. And for more advanced automation, Inbox Zero's AI automation can handle these tasks intelligently.
Use Sweep for "soft unsubscribe":
Sweep is a powerful tool available in Outlook on the web, Outlook.com, and many work mailboxes. It lets you automatically handle emails from specific senders without blocking them entirely. With Sweep, you can automatically delete all incoming email from a sender, keep only the latest email from a sender, or delete emails older than 10 days from a sender. Sweep rules run once per day, so it's like having a daily cleanup crew for your inbox.
How to use Sweep (Outlook on the Web):
Select an email from the sender you want to manage, then click Sweep on the command bar. Choose your desired rule (delete all, keep latest, etc.) and select Sweep to apply. This is incredibly effective for situations like: "I don't want to unsubscribe from my daily deals newsletter because I might want those deals someday, but I also don't want them clogging my inbox." Sweep can auto-delete them daily or keep just the most recent one.
Use Inbox Rules for advanced automation:
For more complex scenarios, Outlook's Rules feature lets you automatically take actions on incoming mail based on conditions you set. For even more powerful automation, check out Inbox Zero's AI Personal Assistant, which can learn your preferences and automate email handling intelligently.
You could, for example, automatically delete emails with certain keywords in the subject, move emails from specific domains to a dedicated folder, or auto-file receipts from shopping sites into a "Receipts" folder.
How to create rules (Outlook on the Web):
Go to Settings → Mail → Rules, then click "Add new rule." Set a name (e.g., "Auto-delete daily newsletters"), add your conditions (such as From contains a certain address or domain), and set actions (like Delete or Move to folder). Save the rule, and Outlook will apply it to incoming emails server-side.
On Outlook Desktop (Windows), go to Home → Rules → Manage Rules & Alerts, then create a new rule with your desired conditions and actions.
Using rules effectively functions as an "advanced unsubscribe." You're not informing the sender, but you're automatically cleaning those emails out so you never have to see them. One downside: the unwanted emails may still hit your mailbox (counting against storage) and just get deleted, rather than truly stopping them at the source. Still, for persistent senders or situations where you can't unsubscribe, rules get the job done.
Bulk Unsubscribe: The Faster Way with Inbox Zero
Let's be honest: manually unsubscribing from emails (even with Outlook's built-in tools) is tedious and time-consuming. If you have dozens or hundreds of unwanted subscriptions, clicking "Unsubscribe" one by one can take hours.
And here's the problem with Outlook's native tools: the Subscriptions page (Outlook.com) still requires clicking "Unsubscribe" for each sender individually with no "select all" option. Outlook doesn't show you any insights about those senders — how many emails did they send you last month? Do you actually read them? You're left guessing which newsletters are worth keeping. And if you have multiple email accounts or years of accumulated subscriptions, doing this manually is exhausting.
This is where a dedicated bulk unsubscribe tool changes everything. And it's exactly why we built Inbox Zero.
How Inbox Zero's Bulk Email Unsubscriber Works
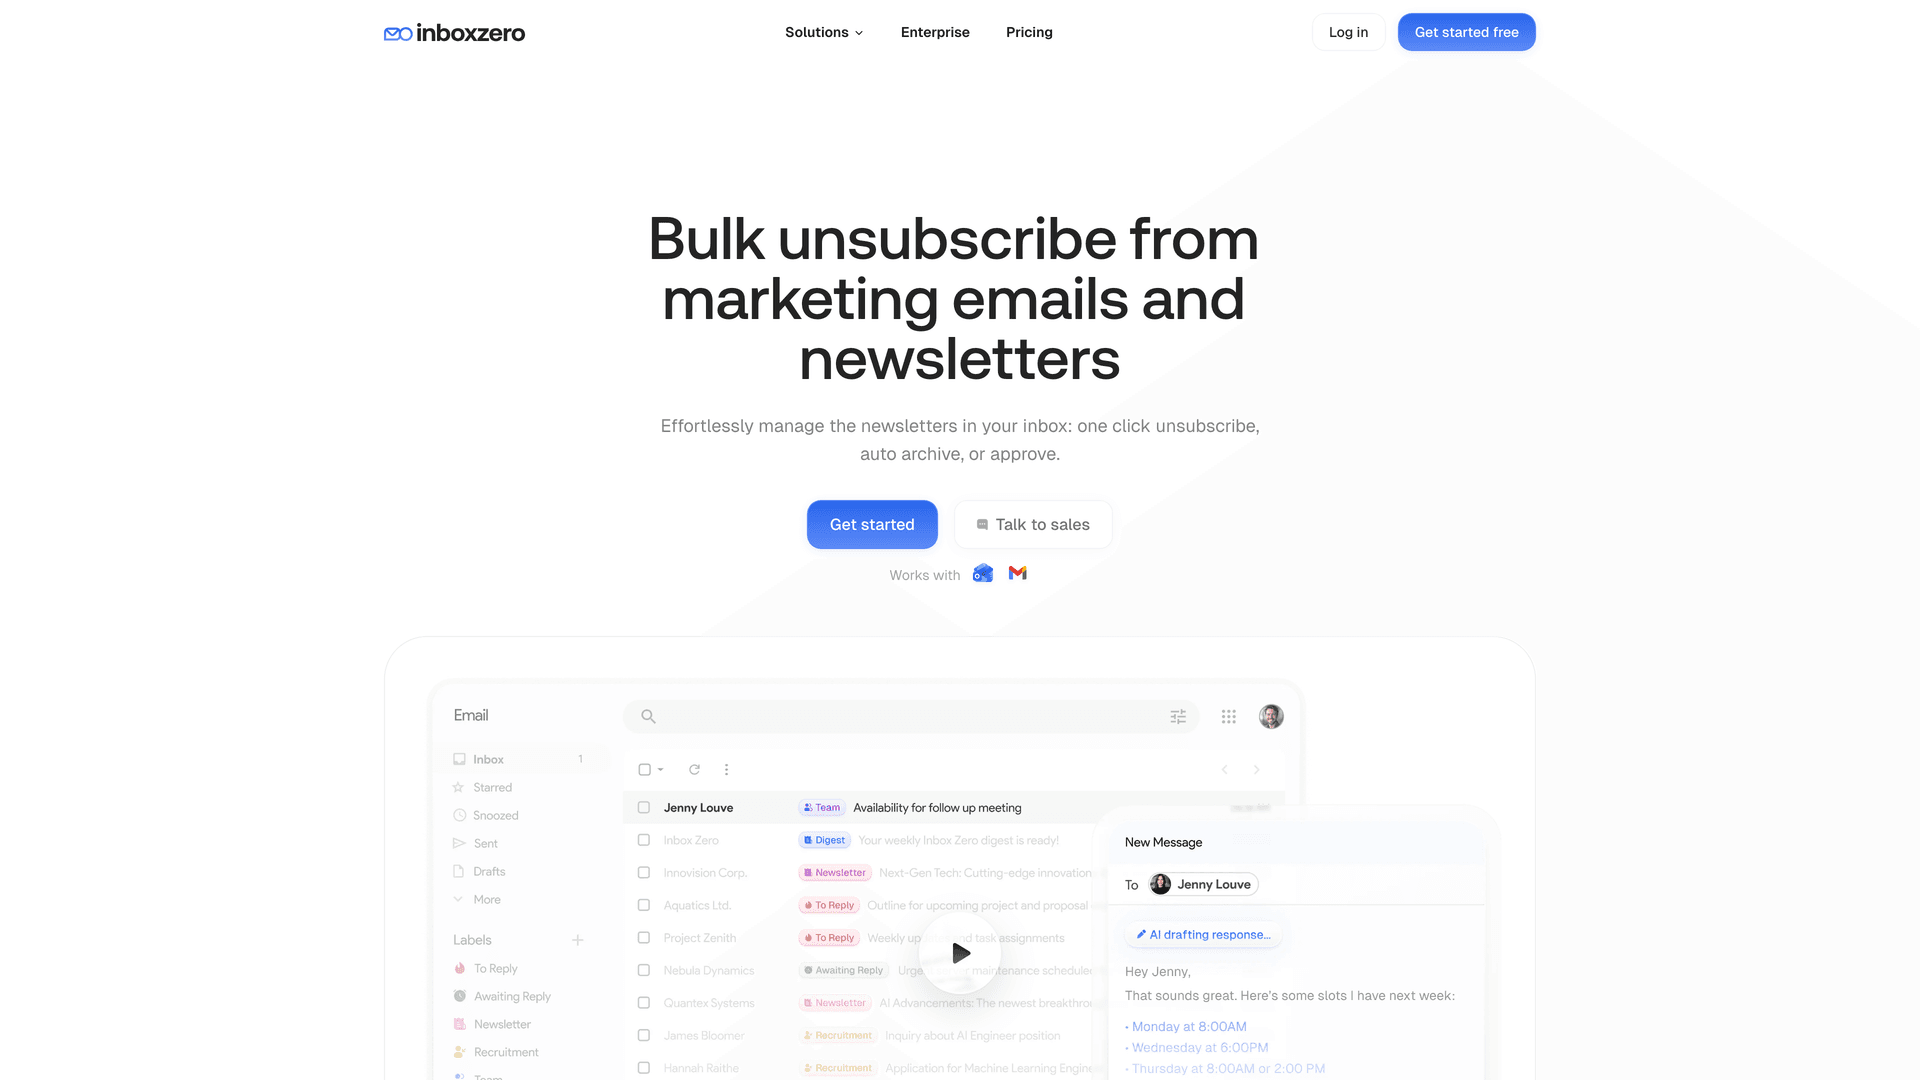
Inbox Zero is an open-source AI email assistant designed specifically to help you reach inbox zero faster. One of its most powerful features is the Bulk Email Unsubscriber, which works with both Gmail and Microsoft 365/Outlook accounts. Here's how it solves the manual unsubscribe problem.
All subscriptions identified in seconds
Once you connect your Outlook account to Inbox Zero (via secure OAuth, the same method as signing into a third-party app with Microsoft), the tool scans your email headers to find all messages that look like newsletters or promotions. It then presents you with a consolidated list of senders in a clean dashboard. You no longer have to hunt emails one by one — they're all listed for you.
One-click unsubscribe, auto-archive, or keep
Next to each sender in the list, you have three options. You can click Unsubscribe to trigger an automatic unsubscribe for that sender — Inbox Zero handles the process using the sender's provided unsubscribe mechanism or ensuring those emails are filtered out, and you won't get new ones from them.
You can choose Auto Archive + Label, which is the "soft unsubscribe" option. Inbox Zero will automatically move future emails from that sender out of the inbox and optionally apply a label or category (like "Newsletter") so they don't distract you. This is perfect for newsletters you want to support by staying subscribed but admit you rarely read — they're still there if you search for them, just not in your face.
Or you can select Keep/Approve, which tells the system that this is a sender you actually value, so it won't suggest unsubscribing them again.
Batch actions save hours
Here's where it gets powerful: you can go down the list and hit Unsubscribe on dozens of senders in one session, then confirm once. In a couple of minutes, you might unsubscribe from 100+ email lists — something that could take hours manually.
Reading behavior insights
Inbox Zero's dashboard shows what percentage of emails from each sender you actually read versus archive or delete. For example, if you only opened 1% of emails from "ShopWeekly Deals" and archived the rest, that's a strong hint you won't miss them. These analytics help you prioritize the worst offenders in your inbox — you can see at a glance which senders are taking up space without providing value. Learn more about understanding your email patterns with analytics.
Safe and privacy-conscious
When using any third-party email tool, security matters. Inbox Zero is SOC 2 compliant and was audited by Google for secure integration (it's CASA Tier 2 approved for Gmail/Workspace). It doesn't store your full emails on its servers, and if you prefer maximum control, Inbox Zero is open-source so you can even self-host it. Essentially, it's designed to respect your data and privacy while giving you powerful cleanup options. Read more about security for enterprise users.
Works seamlessly with Outlook
Inbox Zero initially launched for Gmail, but now supports Microsoft 365/Outlook accounts. You connect your Outlook via Microsoft's secure API, and Inbox Zero can perform actions like moving messages or sending unsubscribe requests on your behalf (with your approval).
Beyond unsubscribing: Extra features you'll love
While we're focused on unsubscribing here, it's worth noting that Inbox Zero includes other productivity features. The Cold Email Blocker automatically labels or archives unsolicited sales emails. The AI Email Assistant drafts replies, labels emails, and automates routine responses. Email Analytics shows your top senders, reading patterns, and cleanup opportunities. And the Chrome Extension, Inbox Zero Tabs for Gmail, adds custom tabs to Gmail for better organization (100% private, client-side). But for our purposes here, the Bulk Unsubscriber is your secret weapon for inbox cleanup.
How to get started:
Sign up for Inbox Zero (there's a free trial to test it out), then connect your Outlook/Microsoft 365 account securely. Go to the Bulk Unsubscribe dashboard, where you'll immediately see a list of subscription senders identified automatically. Review each sender and choose Unsubscribe, Auto-Archive, or Keep. Hit Apply to execute all those actions in one go — Inbox Zero will handle unsubscribing or setting up auto-archive filters in the background.
According to the Inbox Zero team, you can review and unsubscribe from hundreds of newsletters at once, essentially spring-cleaning your inbox with minimal effort.
Maintain a cleaner inbox on autopilot
By using a tool like Inbox Zero, you can maintain inbox cleanliness on an ongoing basis. Log in once a month, see any new subscriptions that have appeared, and one-click unsubscribe from them immediately. This proactive approach means no more email "weed whacking" every day — the clutter just never arrives in your inbox to begin with. For more strategies, check out our guide on email management strategies.
Still Getting Emails After Unsubscribing? Here's Why
You clicked "Unsubscribe," confirmed it, and yet... the emails keep coming. Frustrating, right? This is surprisingly common, but usually fixable. Here's how to diagnose and solve it.
Give it time (for legitimate marketers)
In the U.S., the FTC's CAN-SPAM Act says senders must honor opt-out requests within 10 business days. If it's been less than that and it's a legitimate company, you may still see a few more emails while the request propagates through their systems. Be patient — mark them as read or delete them for now. If it's been more than 10 business days and they're still emailing you, move on to the next steps.
You unsubscribed from one list, but you're on several
Many brands operate multiple email lists. When you unsubscribe from one, you're still on the others. Here's what to watch for:
| List Type | Example | What To Do |
|---|---|---|
| Daily vs Weekly | "Daily deals" vs "Weekly digest" | Unsubscribe from both |
| Product Lines | Shoes list vs Clothing list | Check preferences page |
| Different Domains | marketing@brand.com vs newsletters@brand.com | Block entire domain |
Check the email carefully. Look for a "Manage preferences" or "Email settings" link (usually in the footer). Go there and turn off everything you don't want. Or, if the sender has multiple domains, consider blocking the entire domain instead of unsubscribing piecemeal.
The sender is ignoring your unsubscribe request (spam)
If the email was spam or shady marketing to begin with, "unsubscribe" may have been a trap. They never intended to honor it. CISA warns not to click links (including "unsubscribe") in suspected phishing emails, and security reporting has highlighted cases where clicking unsubscribe can confirm your email is active or lead to malicious pages.
The solution is to stop trying to unsubscribe. Instead, mark the messages as junk or report them as phishing, block the sender or domain (see Method 4 above), and use Sweep or Rules to auto-delete anything that slips through. This approach ensures you never see them again, whether they respect your request or not.
The email is transactional (you can't unsubscribe)
Some emails can't be unsubscribed from because they're "required service emails" — things like purchase receipts, password reset confirmations, billing notices, and security alerts. These are often legally exempt from unsubscribe requirements because they're necessary for the service you're using. You typically need to change notification settings in the service itself (like your Amazon account or bank portal), and sometimes you can't turn them off at all. That's normal. Focus on unsubscribing from marketing emails instead.
How to Keep Your Outlook Inbox Clean Long-Term
Unsubscribing isn't a one-and-done task. New unwanted emails will creep in over time as you sign up for services, make online purchases, or unknowingly get added to lists. The key is building a sustainable system to keep your inbox clean.
Weekly 10-minute "unsubscribe maintenance"
Set aside 10 minutes each week (Friday afternoon works great) to stay on top of things. Or check out our complete inbox zero method for a more comprehensive approach.
When you notice a newsletter you no longer read, use Outlook's built-in Unsubscribe button right away — don't let them pile up. Use Outlook's Sweep feature for things like daily summaries or automated notifications to auto-delete or keep only the latest. If something looks suspicious or you didn't request it, don't click unsubscribe — block instead. Once a month, check Settings → Mail → Subscriptions and prune any new additions. And every few months, log into Inbox Zero, review any new subscriptions that have accumulated, and bulk unsubscribe to catch anything you missed.
For more tactical approaches, explore our email management tips and learn how to manage your inbox effectively.
The compounding benefits
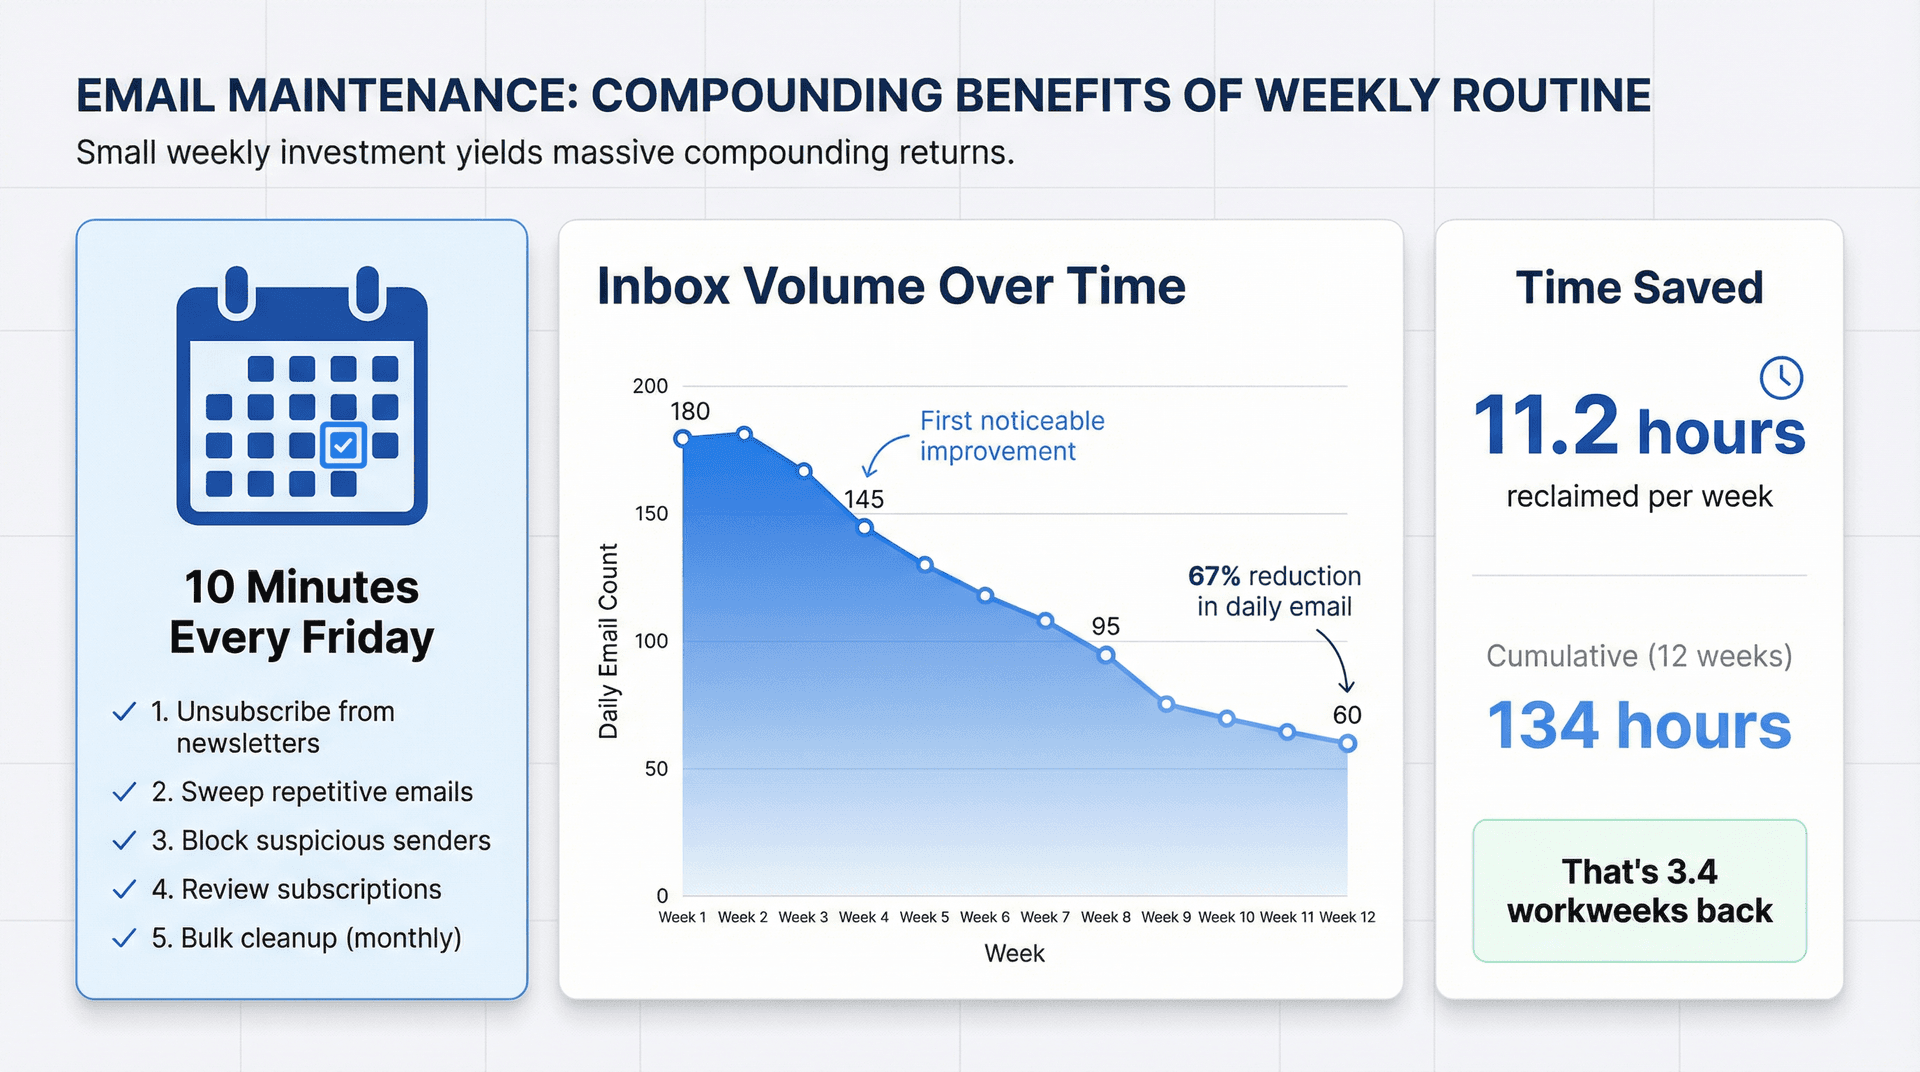
The beauty of this system is that it compounds over time. Every newsletter you unsubscribe from means fewer emails tomorrow. Every sender you block means less spam next week. Many users report feeling less stressed and more in control of their inbox after cutting off the constant flow of junk.
It's easier to achieve that coveted "Inbox Zero" state when you're not constantly swatting away newsletters and spam. Important messages stop getting buried. You spend less time sorting and more time doing actual work. Or explore more email management software options to further optimize your workflow.
Start Cleaning Your Outlook Inbox Today
A cluttered inbox doesn't have to be your daily reality. By actively unsubscribing from emails you don't need, you can significantly reduce the noise and reclaim hours of your week.
Here's your action plan: start with Outlook's built-in tools — use the Unsubscribe button for any newsletter or promo email you recognize and no longer want, as it's the fastest, safest method when it works. Be cautious with suspicious emails and only unsubscribe if the email is from a legitimate source you recognize. If it's spam from someone you never subscribed to, block the sender instead to avoid confirming your address to spammers.
Take advantage of Outlook's advanced features too. Add persistent senders to your Blocked list, use Sweep for soft unsubscribes, and set up Rules to auto-delete categories of email you never want to see. If you're drowning in subscriptions, Inbox Zero can help you unsubscribe from hundreds of emails in one session instead of spending hours doing it manually — in one afternoon, you can do what would have taken you weeks.
Most importantly, build sustainable habits. Make unsubscribing part of your weekly routine. The sooner you remove unwanted senders, the less clutter accumulates. Check out our email inbox management guide for more best practices.
The result?
With fewer unwanted emails, you'll notice that important messages stop getting drowned in the noise. You'll feel less overwhelmed when you open Outlook in the morning. You'll spend less time sorting and deleting, and more time on work that actually matters.
Start today. Pick one method from this guide, unsubscribe from five newsletters you never read, and see how much better your inbox feels.
Then keep going. Your future self will thank you. And if you want to achieve true inbox zero, we're here to help.
What is the Inbox Zero Method & How do I Master It?
Discover the Inbox Zero method and learn simple steps to take control of your email inbox, stay organized, and boost productivity.

4 Email Productivity Hacks from Tim Ferriss, Andrew Huberman, and Sam Harris
Explore 4 powerful email productivity hacks from tech and wellness experts like Tim Ferriss and Andrew Huberman. Learn to create focus, optimize processing, manage time wisely, and delegate effectively to conquer your inbox.
Best Time to Send Emails for Response (2026)
Stop guessing when to send emails. Get data-backed timing strategies from 2026 research that improve response rates across all scenarios.
How To Organize Outlook Inbox? (2026 Guide)
Learn how to organize Outlook inbox with rules, folders, categories, and AI automation. Step-by-step guide for 2026 that actually works.